GONUTS has been updated to MW1.31 Most things seem to be working but be sure to report problems.
Help:Editing Tables
New annotations can be entered, or existing annotations edited, by any registered user. Editing and entering information into the tables is relatively simple, but consider using the Notes section below the table for comments or non-annotation additions. Please note that in the following guide the titles of the boxes in the pictures, and the text in the boxes, may be different from the table you are editing.
Editing and Entering Information
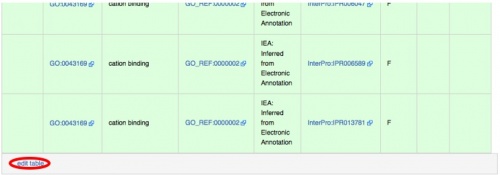
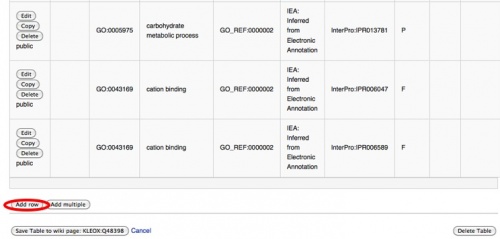
To add new data or to modify existing data, click the edit table link on the bottom, left-hand side of the Annotation table. An editable version of the table will appear. An example is shown in the next image.
Two options are available to let you add new data:
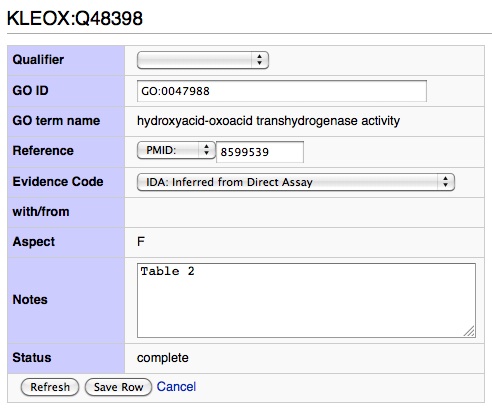
- The best (and easiest!) is the Add row button near the bottom of the table. This will take you to the form shown in the next image. It is strongly recommended that you use this option.
- The Add multiple button allows several rows to be added simultaneously, but does not automatically add information like the form (eg, the "GO term name") nor does it verify you made a complete entry (see next caption for more details). If you know all the information needed and wish to use this function, the syntax is provided on the page you enter your data on. If you are using the Add multiple function and you need to leave a column blank (eg, neither your GO term nor your evidence require a with/from entry), do not enter any characters between the pipes.
Several fields are editable from this page, and several are filled in based on the rest of the information in the table. A quality annotation needs at least a GO ID, a Reference, and an Evidence Code. If you only have enough information to add a partial annotation, you are encouraged to do so; it will not be marked "complete" but it is expected the community will update your annotation as more information is made available. Note: Students taking CACAO classes are required to make complete entries, you will not recieve any credit unless your annotation has all required elements.
- The Qualifier field is a drop-down menu that is only applicable in a few cases, and is generally left blank. See the GO guide for more details and some examples. Keep in mind:
-NOT only applies when a GO term is likely to be applied but has been experimentally proven that term is not applicable.
-Contributes to is for Function terms only.
-Colocalizes with is for Component terms only.
-incorrect (CACAO) is used by judges or students in the CACAO classes to indicate an annotation is incorrect and unsalvagable, and will/should be deleted (eg, is incomplete, on wrong page, etc).
- The GO ID field is required. Enter the identification number corresponding to the desired GO term in the format GO:XXXXXXX. You can just copy and paste this from the term's page.
- The GO term name will be automatically filled in by the computer, and helps you verify that you used the right GO ID in the previous field.
- The Reference(s) field is also required. It is preferred that you provide a PubMed ID, found by searching for the document at PubMed. Select PMID: from the drop-down menu, and enter the numerical PMID. If you have a PMCID, use the converter at http://www.ncbi.nlm.nih.gov/sites/pmctopmid. GO_REF: is provided mainly for automatic entries. If you absolutely cannot find a PMID, you can enter another form of identification by selecting other. This includes books, theses, DOIs, etc.; please try to give as much identification as you can in order to allow others to easily find the information. If you have multiple sources choose the oldest source that supports the most detailed GO term available.
- The Evidence Code drop-down menu has the available evidence codes, and this field is mandatory for a "complete" annotation. More information, and examples, can be found at http://www.geneontology.org/GO.evidence.shtml. Not all evidence codes shown in the guide may be available to all users, but all except the rarest evidence codes are available to all users. CACAO students note: only a handful of evidence codes are acceptable for class credit.
- The with/from field will open up if an evidence code that can or must use the field is selected. Depending on the requirements of the evidence code, a Uniprot accession number, GO ID, or several other types of IDs can be entered. Select the appropriate field from the drop-down menu and fill in the field. Note: the following example IDs are completely random, but links are provided so you can become familiar with the assigning website.
- UniProtKB: use the UniProt accession number; this will usually be alphanumeric and resemble P03040.
- InterPro: this can be found at the EBI website and should be in the form IPR004091.
- PMID: a document's numeric PubMed identification in the form 6981459 can be found by searching the PubMed site.
- The other options are mostly organism-specific databases, since GONUTS encompasses data on many organisms the identification provided by any of these databases is acceptable.
- Another row will appear once one is filled in in case multiple rows are needed (eg, an IGI that needs three proteins entered in the with/from field will use three rows of information in this area).
- The Aspect field will be filled out automatically when you enter a GO ID. This field simply indicates if the GO ID is a Process, Function, or Component term.
- Although the Notes field is optional, clarifications or comments applicable to the GO and the gene/protein may be entered here. The paper itself has its own GONUTS page, and comments pertaining to the whole paper or more than just the specific gene/protein may be entered there. CACAO students note: ask your instructor if you are required to complete this field. Annotations made as part of a CACAO class aren't acceptable without a note of the specific figure or table that supports the annotation.
- The Status field is another uneditable field, and will tell you if the annotation is complete. If the entry isn't complete, the line will list which of the mandatory fields you still need to enter. This field will not tell you if your entries are in the recommended format (eg, if your PMID is valid), simply that there is some entry in the required fields.
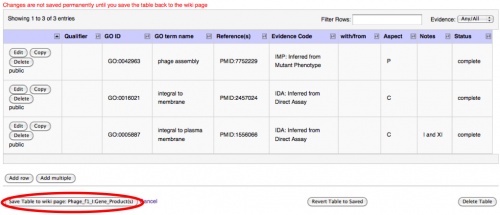
There may be information already in the table that you wish to change. This can be done by editing the information in the pertinent boxes, and then saving as you would a new entry. Content that has been added by the community can be edited. In the image to the left, any of the columns may be edited. Please note that data marked protected has been added by Wiki scripts and can not be edited. However, if you consider something to be wrong or needing to be changed, we encourage you to make your voice heard by editing the table or writing in the section marked Notes below the table.
After entering all the information you can, or making a complete entry, the Refresh button will reload the Go term name, Status, and other automatic columns. This is especially useful when editing an entry, as it ensures the GO term name matches the GO ID (if you changed it). The Status may not also not reflect recent changes unless you refresh before saving. The Refresh button is not required, and annotations can be made without using it, but it is recommended as the most recent Status verifies you have included all the components of a complete annotation. Note: Neither the Refresh button, nor a status of "complete", are indications that an annotation is correct, merely that all components are present and in the most recent form.
After entering or editing the information in the table, click on the Save Row button at the bottom of the table.
Any changes you have made are not yet saved at this point.
- If you wish to change another row, or go back and edit the annotation you just added, use the Edit button for that row. You can edit information added by yourself or the community, and you can edit a row without adding a row.
- If you wish to add a similar annotation to the same protein (eg, you just added a Component term but also wish to add a Function term from the same paper), you might consider using the Copy button. This will add an exact duplicate, which you can change with the Edit button. You can also use the Add Row and create an entirely new entry for the gene product.
The Edit, Copy and Delete buttons on a row will only execute the given function on that row.
When the row(s) you have added/edited appear to be complete, you need to save again. This is the final save page, where you must save for the second time or your modifications will not be kept. The Save Table to wiki page:__________ button will make your changes appear on the main page; Cancel or Revert Table to Saved will delete your changes. The Cancel button will take you back to the main Gene Products page, whereas the Revert Table to Saved will delete your changes but will keep you on the page where you can edit the table.


